개인프로젝트 일지_6 | 프론트엔드와 백엔드 연동하기
원래 계획은 백엔드 역량 강화에 집중하기 위해 프론트엔드는 간단하게 구현하려고 html, css, javascript만 쓰려고 했었다.
그런데 이번 프로젝트에 채팅, 캘린더 기능이 있어서 새로운 페이지를 자주 렌더링해야하기 때문에 리액트가 더 적합하다는 생각이 들었다.
프론트엔드는 React를 쓰는 걸로..땅땅!!
1. 백엔드(스프링 부트) 설정파일 추가
✅SecurityConfig
package Project_1st.planBuddy;

import org.springframework.context.annotation.Bean;
import org.springframework.context.annotation.Configuration;
import org.springframework.security.config.annotation.web.builders.HttpSecurity;
import org.springframework.security.config.annotation.web.configuration.EnableWebSecurity;
import org.springframework.security.web.SecurityFilterChain;

@Configuration
@EnableWebSecurity
public class SecurityConfig {

    @Bean
    public SecurityFilterChain securityFilterChain(HttpSecurity http) throws Exception {
        http
                .csrf(csrf -> csrf.disable()) // CSRF 보호 비활성화
                .authorizeHttpRequests(authorize -> authorize
                        .requestMatchers("/api/**").permitAll() // /api/hello 엔드포인트에 대한 인증 비활성화
                        .anyRequest().authenticated() // 다른 모든 요청은 인증 요구
                )
                .formLogin(form -> form.disable()); // 기본 로그인 폼 비활성화

        return http.build();
    }
}
현재 Spring Security 의존성이 프로젝트에 포함되어있다.
소셜 로그인을 구현하지 않은 상태에서는 API 엔드포인트에 자유롭게 접근하게해야 테스트를 할 수 있기때문에
임시로 비활성화를 했다.
✅WebConfig
package Project_1st.planBuddy;

import org.springframework.context.annotation.Bean;
import org.springframework.context.annotation.Configuration;
import org.springframework.web.servlet.config.annotation.CorsRegistry;
import org.springframework.web.servlet.config.annotation.WebMvcConfigurer;

@Configuration
public class WebConfig {

    @Bean
    public WebMvcConfigurer corsConfigurer() {
        return new WebMvcConfigurer() {
            @Override
            public void addCorsMappings(CorsRegistry registry) {
                registry.addMapping("/api/**")
                        .allowedOrigins("http://localhost:3000") // React 애플리케이션의 주소
                        .allowedMethods("GET", "POST", "PUT", "DELETE", "OPTIONS")
                        .allowedHeaders("*")
                        .allowCredentials(true);
            }
        };
    }
}
✔️CORS 설정이 없으면, 브라우저는 보안상의 이유로 다른 출처에서 오는 요청을 차단할 수 있다.
✔️ React 애플리케이션이 http://localhost:3000 주소에서 실행되고 있을 때, 이 주소에서 오는 모든 /api/** 경로로의 모든 HTTP 요청을 허용한다.
✅HelloController
package Project_1st.planBuddy;

import org.springframework.web.bind.annotation.GetMapping;
import org.springframework.web.bind.annotation.RestController;

@RestController
public class HelloController {

    @GetMapping("/api/hello")
    public String hello() {
        return "프론트, 백 연동 완료!";
    }
}
"/api/hello"엔드포인트를 매핑하고 문자열을 반환한다.
이제 이 문자열을 프론트 서버에서 확인할 수 있다면 연동이 완료된 것!
2. 프론트엔드
src 폴더 하위에 App.js와 index.js를 수정해줬다.
✅App.js
import React, { useState, useEffect } from 'react';
import './App.css';

function App() {
    const [message, setMessage] = useState('');

    useEffect(() => {
        fetch('http://localhost:8090/api/hello')
            .then(response => response.text())
            .then(data => setMessage(data));
    }, []);

    return (
        <div className="App">
            <header className="App-header">
                <h1>{message}</h1>
            </header>
        </div>
    );
}

export default App;
fetch를 사용하여 백엔드 엔드포인트에 HTTP GET 요청을 보낸다.
응답이 오면 text형태로 변환하고 변환된 텍스트 데이터를 message 상태로 설정한다.
return은 화면을 렌더링하는 부분이다.
연동이 완료 됐다면, {message}안에 '프론트, 백 연동 완료!' 문자열이 담겨야한다.
✅index.html
<!DOCTYPE html>
<html lang="en">
<head>
  <meta charset="UTF-8">
  <meta name="viewport" content="width=device-width, initial-scale=1.0">
  <title>React App</title>
</head>
<body>
<noscript>You need to enable JavaScript to run this app.</noscript>
<div id="root"></div>
</body>
</html>
id가 root!
이 DOM요소에 렌더링 할거임.
✅index.js
import React from 'react';
import ReactDOM from 'react-dom';
import './index.css';
import App from './App';
import reportWebVitals from './reportWebVitals';

ReactDOM.render(
    <React.StrictMode>
        <App />
    </React.StrictMode>,
    document.getElementById('root')
);

reportWebVitals();
document.getElementById('root')를 사용하여 id가 root인 DOM 요소에 렌더링한다.
3. 결과
스프링 부트 서버 실행 ▶️ 리액트 npm start ▶️ url 확인
1) Postman으로 localhost:8090/api/hello 테스트
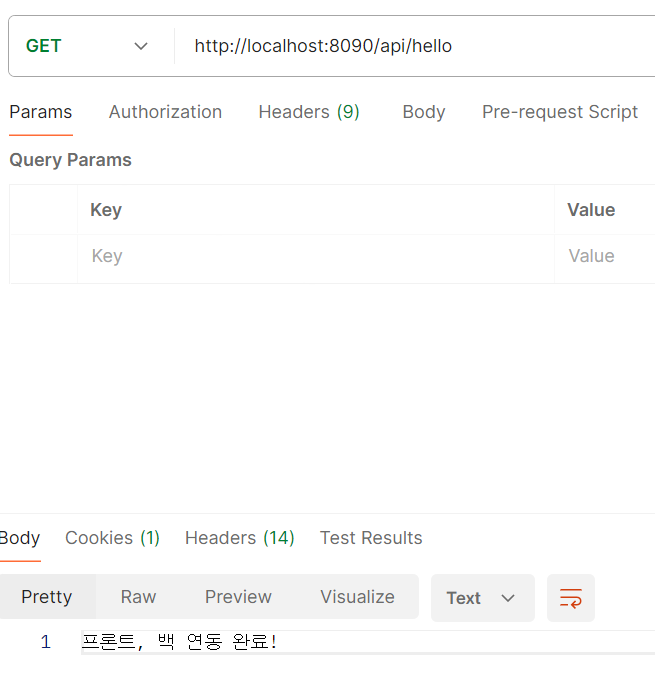
프론트, 백 연동 완료! 문자열이 반환됨.
2) localhost:3000 확인
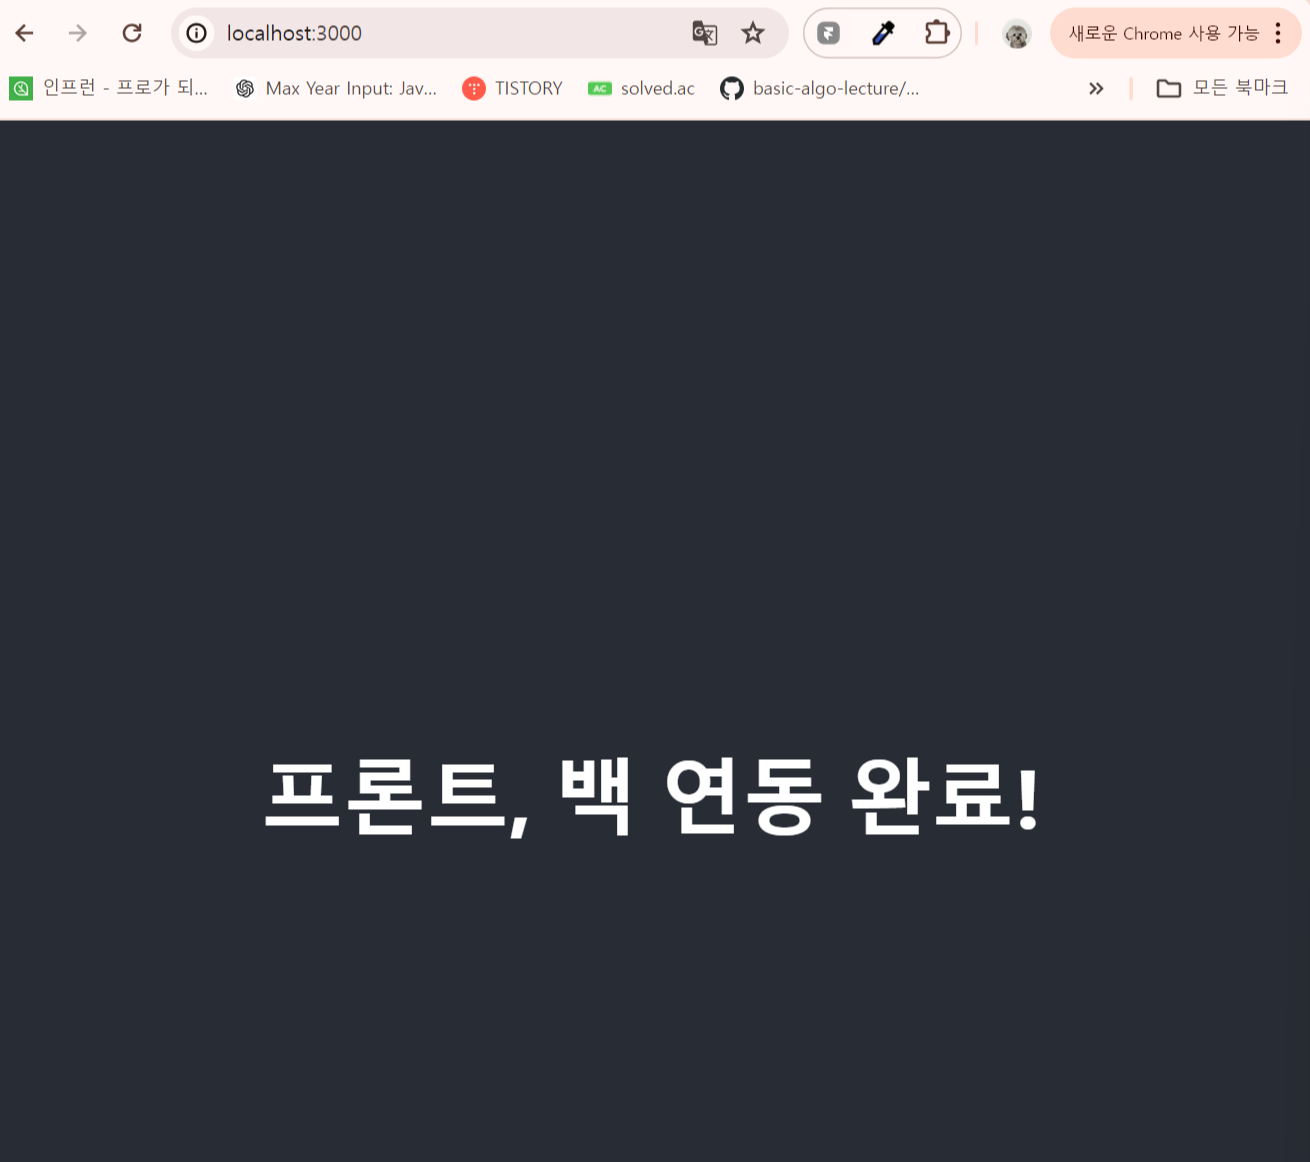
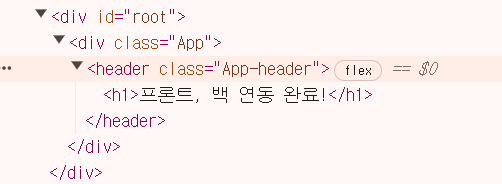
'root' div에 h1태그안에 백엔드에서 받아온 message가 잘담겨있다.