
원래 계획은 백엔드 역량 강화에 집중하기 위해 프론트엔드는 간단하게 구현하려고 html, css, javascript만 쓰려고 했었다.
그런데 이번 프로젝트에 채팅, 캘린더 기능이 있어서 새로운 페이지를 자주 렌더링해야하기 때문에 리액트가 더 적합하다는 생각이 들었다.
프론트엔드는 React를 쓰는 걸로..땅땅!!
1. 백엔드(스프링 부트) 설정파일 추가
✅SecurityConfig
package Project_1st.planBuddy;

import org.springframework.context.annotation.Bean;
import org.springframework.context.annotation.Configuration;
import org.springframework.security.config.annotation.web.builders.HttpSecurity;
import org.springframework.security.config.annotation.web.configuration.EnableWebSecurity;
import org.springframework.security.web.SecurityFilterChain;

@Configuration
@EnableWebSecurity
public class SecurityConfig {

    @Bean
    public SecurityFilterChain securityFilterChain(HttpSecurity http) throws Exception {
        http
                .csrf(csrf -> csrf.disable()) // CSRF 보호 비활성화
                .authorizeHttpRequests(authorize -> authorize
                        .requestMatchers("/api/**").permitAll() // /api/hello 엔드포인트에 대한 인증 비활성화
                        .anyRequest().authenticated() // 다른 모든 요청은 인증 요구
                )
                .formLogin(form -> form.disable()); // 기본 로그인 폼 비활성화

        return http.build();
    }
}현재 Spring Security 의존성이 프로젝트에 포함되어있다.
소셜 로그인을 구현하지 않은 상태에서는 API 엔드포인트에 자유롭게 접근하게해야 테스트를 할 수 있기때문에
임시로 비활성화를 했다.
✅WebConfig
package Project_1st.planBuddy;

import org.springframework.context.annotation.Bean;
import org.springframework.context.annotation.Configuration;
import org.springframework.web.servlet.config.annotation.CorsRegistry;
import org.springframework.web.servlet.config.annotation.WebMvcConfigurer;

@Configuration
public class WebConfig {

    @Bean
    public WebMvcConfigurer corsConfigurer() {
        return new WebMvcConfigurer() {
            @Override
            public void addCorsMappings(CorsRegistry registry) {
                registry.addMapping("/api/**")
                        .allowedOrigins("http://localhost:3000") // React 애플리케이션의 주소
                        .allowedMethods("GET", "POST", "PUT", "DELETE", "OPTIONS")
                        .allowedHeaders("*")
                        .allowCredentials(true);
            }
        };
    }
}✔️CORS 설정이 없으면, 브라우저는 보안상의 이유로 다른 출처에서 오는 요청을 차단할 수 있다.
✔️ React 애플리케이션이 http://localhost:3000 주소에서 실행되고 있을 때, 이 주소에서 오는 모든 /api/** 경로로의 모든 HTTP 요청을 허용한다.
✅HelloController
package Project_1st.planBuddy;

import org.springframework.web.bind.annotation.GetMapping;
import org.springframework.web.bind.annotation.RestController;

@RestController
public class HelloController {

    @GetMapping("/api/hello")
    public String hello() {
        return "프론트, 백 연동 완료!";
    }
}
"/api/hello"엔드포인트를 매핑하고 문자열을 반환한다.
이제 이 문자열을 프론트 서버에서 확인할 수 있다면 연동이 완료된 것!
2. 프론트엔드
src 폴더 하위에 App.js와 index.js를 수정해줬다.
✅App.js
import React, { useState, useEffect } from 'react';
import './App.css';

function App() {
    const [message, setMessage] = useState('');

    useEffect(() => {
        fetch('http://localhost:8090/api/hello')
            .then(response => response.text())
            .then(data => setMessage(data));
    }, []);

    return (
        <div className="App">
            <header className="App-header">
                <h1>{message}</h1>
            </header>
        </div>
    );
}

export default App;fetch를 사용하여 백엔드 엔드포인트에 HTTP GET 요청을 보낸다.
응답이 오면 text형태로 변환하고 변환된 텍스트 데이터를 message 상태로 설정한다.
return은 화면을 렌더링하는 부분이다.
연동이 완료 됐다면, {message}안에 '프론트, 백 연동 완료!' 문자열이 담겨야한다.
✅index.html
<!DOCTYPE html>
<html lang="en">
<head>
  <meta charset="UTF-8">
  <meta name="viewport" content="width=device-width, initial-scale=1.0">
  <title>React App</title>
</head>
<body>
<noscript>You need to enable JavaScript to run this app.</noscript>
<div id="root"></div>
</body>
</html>id가 root!
이 DOM요소에 렌더링 할거임.
✅index.js
import React from 'react';
import ReactDOM from 'react-dom';
import './index.css';
import App from './App';
import reportWebVitals from './reportWebVitals';

ReactDOM.render(
    <React.StrictMode>
        <App />
    </React.StrictMode>,
    document.getElementById('root')
);

reportWebVitals();document.getElementById('root')를 사용하여 id가 root인 DOM 요소에 렌더링한다.
3. 결과
스프링 부트 서버 실행 ▶️ 리액트 npm start ▶️ url 확인
1) Postman으로 localhost:8090/api/hello 테스트
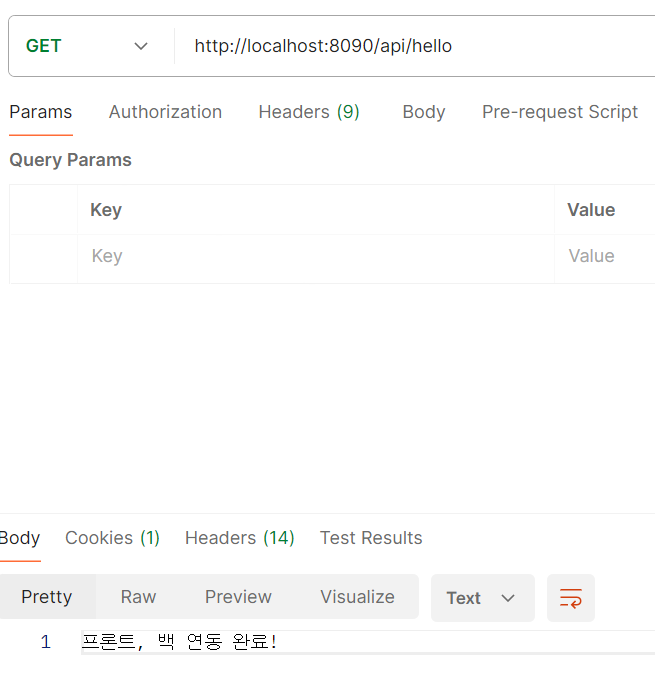
프론트, 백 연동 완료! 문자열이 반환됨.
2) localhost:3000 확인
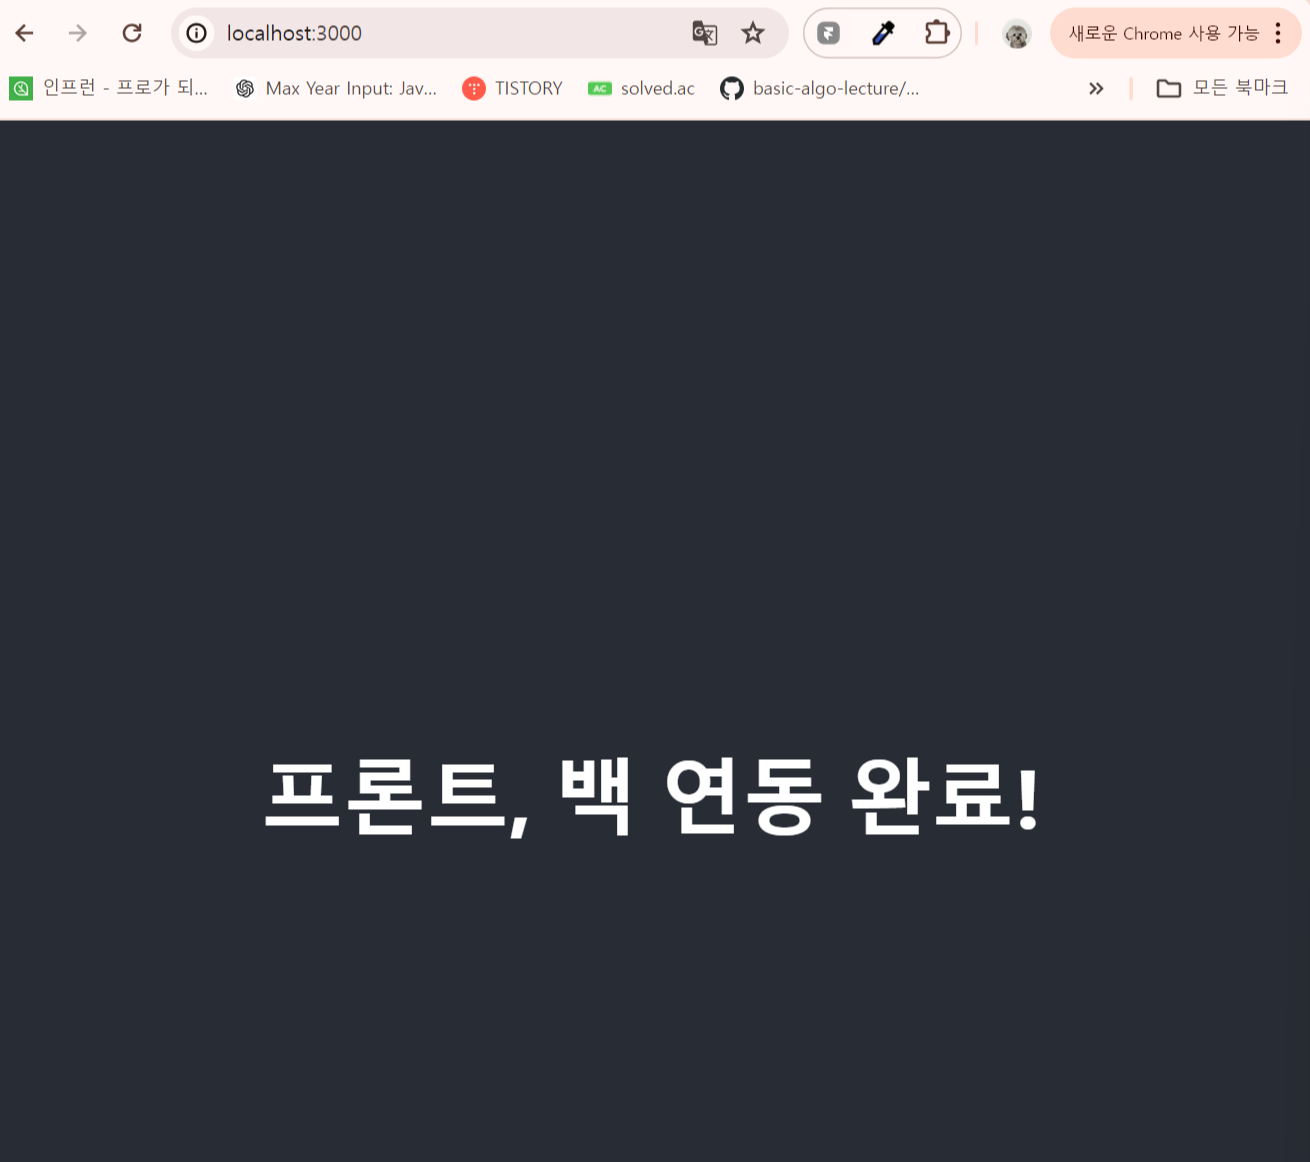
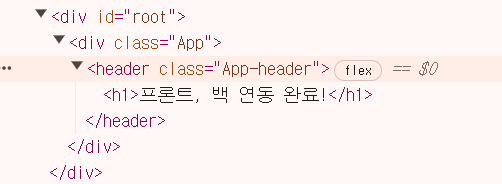
'root' div에 h1태그안에 백엔드에서 받아온 message가 잘담겨있다.
'프로젝트일지' 카테고리의 다른 글
| 개인 프로젝트 일지_5 | MongoDB , 스프링 부트 연동 및 테스트 (0) | 2024.06.05 |
|---|---|
| 개인프로젝트 일지_4 | MongoDB Atlas 클러스터 생성 및 설정 (0) | 2024.06.05 |
| 개인프로젝트 일지_3 | MySQL, JPA 스프링 부트 연동 테스트하는 법 (0) | 2024.06.05 |
| 개인 프로젝트 일지_2 | AWS RDS mysql 설정 (0) | 2024.06.05 |
| 개인 프로젝트 일지_1 | 프로젝트 기획 및 설계 (0) | 2024.06.04 |